AI Lip Sync Not Working? How to Fix a Talking Photo
You made a talking photo, pressed play, and something is off: the mouth trails the words, the lips smear into a blur, or the face barely moves. Almost every one of these problems traces back to one of three inputs, so you can usually fix it by changing the input rather than hoping the next render comes out better.
Short answer: when AI lip sync is not working, check the inputs in this order. The photo needs one sharp, front-facing face with a visible mouth. The audio needs clean speech with no music, long silences or clipping. The settings need a voice language that matches the script and a calm motion style. Fix the weakest input, then test a short clip before rendering the full video.
This guide walks through each symptom, what usually causes it, and what to change. The steps use the TalkPix talking photo studio, but the causes are the same in most photo-to-video lip sync tools.
What you need
- The photo you used, and ideally one or two alternatives of the same person
- The script or audio file from the failed video
- A pair of headphones, so you can hear whether the problem is in the audio or the picture
- A few minutes to test a short clip (about 10 seconds) before you render the whole thing again
First: find out which input is the problem
Before changing anything, watch the bad video twice: once with sound, once muted.
- Muted, does the face look wrong? Blur, warping, a frozen jaw or a flickering face point to the photo or the look and motion setting.
- With sound, does the timing feel wrong? Lips that start late, keep moving in silence or mouth the wrong shapes point to the audio or the voice language.
- Does something appear that was never in your inputs, such as random text or a changed background? That is the model filling gaps, and the fix is usually in how the photo is framed.
Now go to the matching section below.
How to fix AI lip sync in 6 steps
1. Swap in a better source photo
The photo is the cause of most bad results. A lip sync model only sees one still image, so it has to invent every mouth shape it never saw. The less it can see, the more it guesses.
Use a photo where:
- One face is clearly the subject. Group shots make the model pick a face, and it may pick the wrong one.
- The person faces the camera, roughly straight on. A strong side profile hides half the mouth.
- The mouth is visible and relaxed: no hand, microphone, cup or heavy beard covering the lips.
- The face is sharp and evenly lit. A soft, compressed screenshot or a face in deep shadow gives the model too little detail, which shows up as a blurry mouth.
- The face fills a good part of the frame. A tiny face in a wide landscape shot is rebuilt from very few pixels.
Also crop away anything that is not the person: black bars around a screenshot, captions or watermarks already in the picture, or a border from a phone frame. Empty bars and existing text are where models tend to draw extra, unreadable lettering.
Our checklist for the best photo for a talking avatar goes deeper into each of these points.
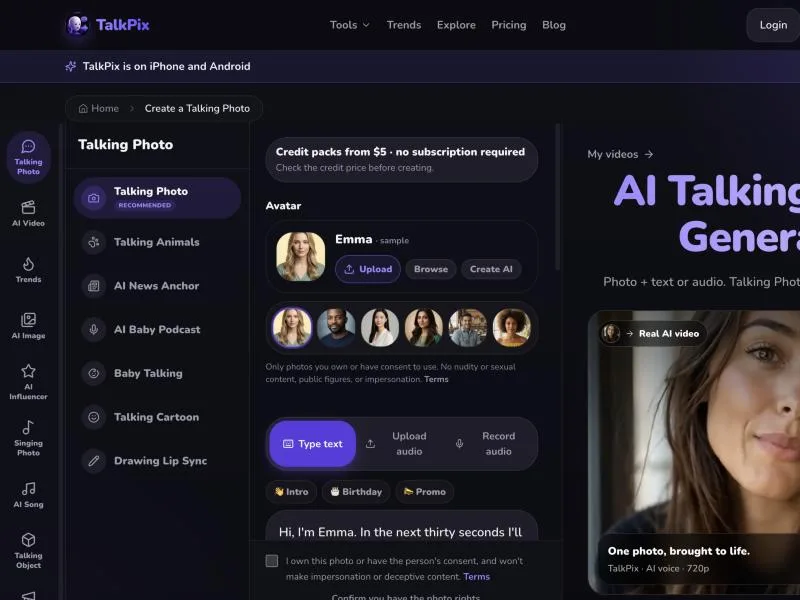
In the studio, use Upload under Avatar to replace the photo, then choose Type text, Upload audio or Record audio for the voice.
2. Clean up the audio
If the face looks fine muted but the timing is off, the audio is the usual suspect. Lip sync models read the sound wave and turn each sound into a mouth shape, so anything that is not clear speech gets turned into movement too.
Common audio problems and their fixes:
- Background music under the voice. The model tries to "speak" the music, so the mouth keeps moving between sentences. Use a voice-only recording, or remove the music in an audio editor first.
- Long silence at the start or end. The face may hold still and then jump, or twitch during the gap. Trim the file so speech starts within the first second.
- Clipping and distortion. A recording that is too loud loses the detail of consonants like p, b and m, which are the shapes viewers notice most. Record again with the microphone a hand's width away.
- Room echo and noise. Record in a small room with soft furnishings, not a bare kitchen.
- Several speakers. One photo can only say one person's lines. Split a conversation into separate clips.
TalkPix accepts MP3, WAV, M4A, AAC, OGG, WebM and FLAC files, up to 5 minutes at 720p. If a file is longer than the limit, the studio asks you to drag the handles to use just part of it. If you are recording your own voice, our guide to lip syncing a photo to your voice covers recording tips step by step.
3. Match the voice language to the script
If you typed a script, an AI voice reads it aloud. A voice set to English will read a Spanish or Turkish script with English pronunciation, and the mouth follows that wrong pronunciation, so the result looks out of sync even when the timing is technically right.
Open Voice and check that the language next to the voice name matches the language of your script. The AI voices speak English (US and UK), Spanish, French, German, Italian, Portuguese (Brazil), Japanese, Korean and Hindi. For any other language, record or upload the speech yourself instead of typing it.
Two script habits also cause odd mouth movement:
- Leftover placeholders. A template line like "Hi, [name]!" gets read out loud, brackets and all. Replace every bracket before you generate.
- Unspeakable text. Emoji, URLs, long numbers and abbreviations are read in unexpected ways. Write numbers and short forms the way you would say them: "twenty twenty-seven", "doctor", "talkpix dot ai".
4. Calm the look and motion
Big expressions are fun, but they ask the model to move a still face much further than the photo shows. That is where warping, smearing and a "rubber" mouth come from.
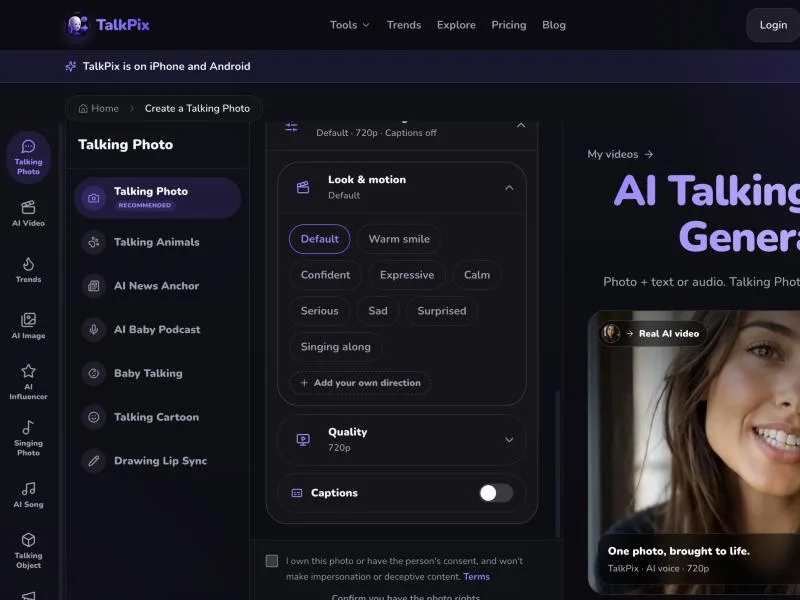
Open Advanced settings, then Look & motion. If the mouth looks unstable, go back to Default or Calm before trying anything else. Save Expressive, Surprised and Singing along for photos that are sharp and front-facing. If you use Add your own direction, describe one small thing ("talking with a gentle smile") rather than big actions like turning around or walking, which a single still image cannot support.
For songs, Singing along gives the face more rhythmic head and mouth movement than a speaking preset, so use it for music rather than speech.
5. Check the resolution and the captions
Under Quality you choose 720p or 1080p. 1080p gives more pixels, not better timing. If a 1080p render shows the face or clothing shifting colour from frame to frame, try the same inputs at 720p before changing anything else. 720p also allows longer videos: up to 5 minutes, against 2 minutes at 1080p.
Next to it, Captions adds subtitles of your own script. If you see readable subtitles you did not want, check that this switch is off. If you see unreadable, made-up text while captions are off, the model drew it itself. Cropping text, borders and black bars out of the photo (step 1) makes this less likely.
6. Test a short clip, then render the full video
Every render is billed by the second, so do not re-run a 3-minute video to test one change. Make a 10-second version with the first line of your script, check it with headphones, and only then render the full length. At 720p, Talking Photo uses 1 credit per rendered second, so a 10-second test costs 10 credits; 1080p uses 2 credits per second. You can check current pack prices on the pricing page.
Change one thing per test: first the photo, then the audio, then the motion setting. If you change everything at once and it works, you will not know what fixed it next time.
Tips and common mistakes
- Do not judge on a phone speaker. Small speakers smear the timing. Use headphones when you check sync.
- Do not upscale a tiny photo and expect detail. An upscaled 300-pixel face is still a 300-pixel face. Find a better original.
- Do not use a filtered selfie. Beauty filters smooth the lips and teeth that the model needs to see.
- Keep sentences short. Short, natural sentences with full stops give the mouth time to close, which looks more human than one long run-on line.
- Keep the original. When you edit and generate again in TalkPix, a new video is rendered for credits and the original stays in My Videos, so you can compare both.
- Failed renders are not charged. If a generation fails before a video is delivered, the reserved credits are returned automatically. A video that renders but looks wrong is a finished render, which is why the short test clip matters.
Why is my AI lip sync out of sync?
Most of the time the audio is the cause, not the picture. Silence at the start, background music or a voice set to the wrong language all make the mouth move at the wrong moments. Trim the audio so speech starts right away, remove the music, and check that the voice language matches the script.
Why does the mouth look blurry in my talking photo?
A blurry mouth usually means the model had too little detail to work with. Low-resolution photos, faces in shadow, heavy filters and partly covered lips all force it to guess. Use a sharp, well-lit, front-facing photo where the mouth is clearly visible, and choose a calm motion setting.
Can I fix a talking photo without making a new video?
Not the lip movement itself. The mouth shapes are created during the render, so changing them means rendering again with better inputs. What you can do before spending more credits is find the cause: watch the video muted and with sound, fix the photo, audio or settings, and test a short clip before the full render.
Does 1080p make lip sync more accurate?
No. Resolution changes how sharp the frame is, not how well the mouth follows the sound. Timing comes from the audio and the voice language. If a 1080p video flickers or the face changes between frames, render the same inputs at 720p, which also costs half the credits per second.
The fix, in short
Watch the bad video muted and with sound, find the input at fault, and change only that: a sharper front-facing photo, clean speech-only audio, a voice language that matches the script, or a calmer motion setting. Test 10 seconds, then render the full video.
Try your fix on a short clip
Upload a sharp, front-facing photo, add clean audio or a script, and test 10 seconds at 720p before you render the full video.
Open the talking photo studio